Observation Links are used when you want to collect data regarding a physical location. A staff member or volunteer clicks on the link using a mobile device. They can then complete the survey while visiting the location. The same link can be used over and over to survey multiple locations. Once the survey is completed for a location, it will generate a Location response within your Distribution.
The staff member or volunteer can also collect data manually on a printed copy of the observation tool and then use the link at a later time from a desktop or laptop computer.
This user guide walks you through the process of configuring SMDS to generate an Observation Link. It is important to have all the required information easily accessible. For a list of required information used to create an Observation Link, review the user guide titled, Planning Your Distribution.
Select the Evaluation and Data Tool
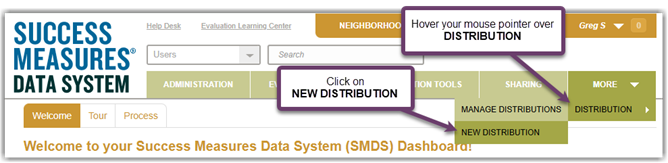
- To access Distributions, click on the drop-down menu icon in the upper right corner of the page. Hover over DISTRIBUTION and click on NEW DISTRIBUTION.
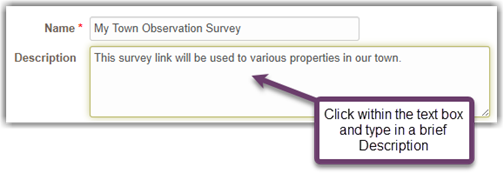
- The Create Distribution page is displayed. Click within the text box labeled Name and type in the name of the Distribution.

- Click within the text box labeled Description and type in a brief description of the Distribution. The description field is optional.
- For the field labeled Evaluation, click on the drop-down menu icon and click on the name of the Evaluation you want to use.

- A list of Tools will appear for the field labeled Data Collection Tool. Click on the radio button for the Tool you want to use. When selecting the Tool, keep in mind that the Information Source must be for a Location.

Please Note: It is strongly recommended you do not include an Expiration Date for your Distribution as it will disable the Link and Distribution on the date entered, and cannot be changed once it has been set.
If you do want to set an Expiration Date, follow these steps.
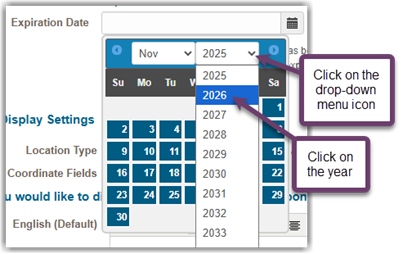
Click on the calendar icon to display the drop-down calendar. Click on the drop-down menu icon for the month and then click on the abbreviated name of the month.

- Click on the drop-down menu icon for the year and click on the appropriate year.
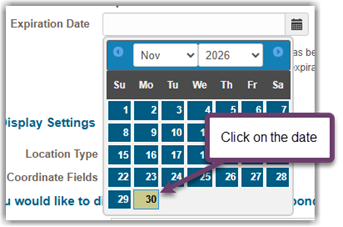
- Click on the date you want to select as the Expiration Date.
Configure the Link Display Settings
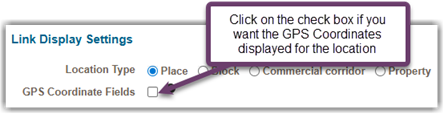
- For the field labeled Location Type, the default selection is Place. If you want to change your selection, click on the appropriate radio button.

- For the field labeled GPS Coordinate Fields, click within the checkbox if you want the Latitude and Longitude coordinate fields displayed when a surveyor enters the address information. Please note that SMDS does not always generate these coordinates. If the observation is filled out on a mobile device, a button will display to get the location fields and will prompt the respondent to allow this function.
- For the custom Welcome message you want displayed for the surveyors, click within the text box labeled English and type in the custom message. You can also copy the text from another document and paste it within the text box.
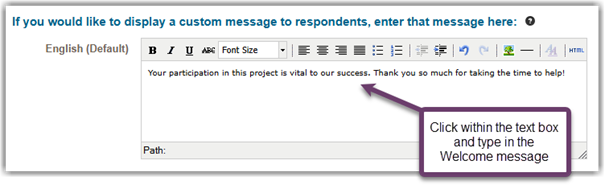
Please Note: When using the text editor for messages, it is important to “Paste as plain text” instead of pasting directly, especially if you pasting from a Word document.
- Click on the button labeled Save, which is located at the bottom of the page.

The Cancel button will cancel and delete a new distribution if it hasn't been saved. If it has been previously saved, the Cancel button will delete any changes.
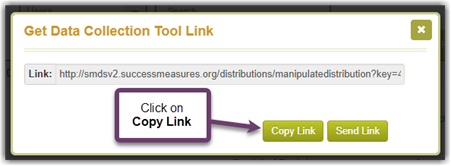
- The Distribution Information page is displayed. To copy the Link to your computer clipboard, click on the button labeled Copy Link to Clipboard.

- A dialog box is displayed. Click on the button labeled Copy Link.
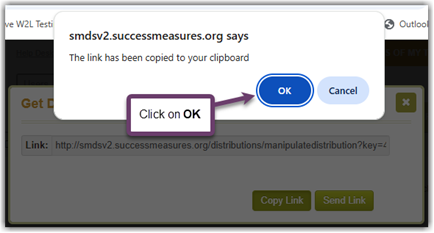
- A message is displayed, confirming the link has been copied to your computer’s clipboard. Click on the button labeled OK.
We suggest you paste the link into a URL shortener to generate a shorter URL which can be shared much more easily. To learn about using a URL shortener, refer to the user guide titled, Creating a New Survey Link for Manual Distribution.
.
Was this article helpful?
That’s Great!
Thank you for your feedback
Sorry! We couldn't be helpful
Thank you for your feedback
Feedback sent
We appreciate your effort and will try to fix the article